LOVE! I really do love to see the multi uses of our products -- and butter molds, how very creative -- You know, I bet you could do the cream cheese mints in the mold too! Thanks Theresalynn for such a creative post!
I was pleasantly surprised to find my Mystery Project was several lovely rose molds, a harp, and cupid. The largest of the rose molds was the perfect size to do something slightly different than your typical Decorate the Cake how to, molded butter! Now, to create a lovely butter to accompany a romantic dinner the choice of mold is very important. Butter is softer and more fragile than candy. It is brittle when its cold, and very soft at room temperature. Unlike gum paste or fondant, butter never hardens. It can be a tricky substance to mold, and your selection of a shape or mold to use will make or break your finished product. To illustrated this very important point, I have included a "what not to do" example along with my how to.
I was pleasantly surprised to find my Mystery Project was several lovely rose molds, a harp, and cupid. The largest of the rose molds was the perfect size to do something slightly different than your typical Decorate the Cake how to, molded butter! Now, to create a lovely butter to accompany a romantic dinner the choice of mold is very important. Butter is softer and more fragile than candy. It is brittle when its cold, and very soft at room temperature. Unlike gum paste or fondant, butter never hardens. It can be a tricky substance to mold, and your selection of a shape or mold to use will make or break your finished product. To illustrated this very important point, I have included a "what not to do" example along with my how to.
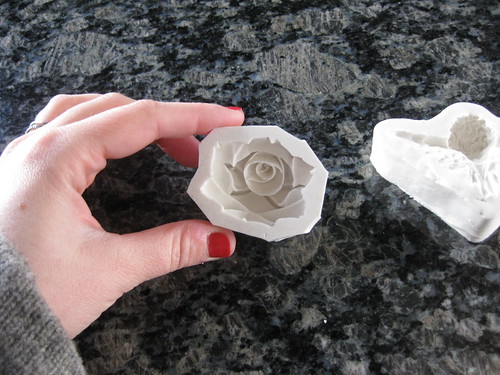
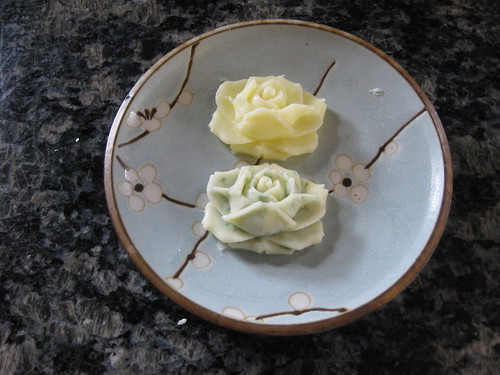
My choice mold for the butter. Notice, the rose is deep and round, compact and with out too many outlying shapes.
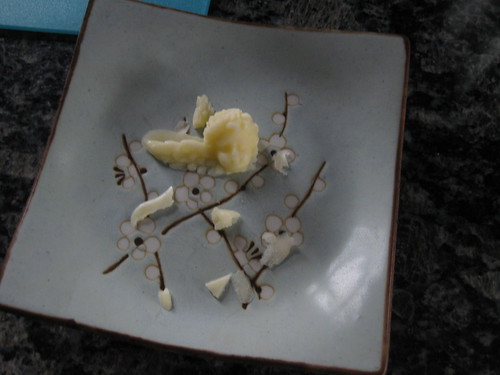
And equally adorable, but ill-suited for a butter application, we have cupid. See how cupids wings are very shallow? Watch what happens to poor Cupid.

To create the butter mold, the easiest way to get the most details from your mold is to melt your butter. The liquid butter runs into every nook and cranny. You can also use softened butter and spackle it in with a butter knife, but I find that there are many air pockets and you lose details in your finished product. The trick to using melted butter is to be careful to not over-melt the butter. Butter has a high water content, and if over heated the water can evaporate out of the butter and mess up the consistency. I put two pats of butter in the microwave for 30 seconds until it looks like this.

A few seconds of stirring ensures that it is melted completely and not over melted. Then pour into your molds and put in the freezer to set for 5 or 10 minutes. The amount of time it takes to set will depend on how large your mold is and how hot your butter was. The good news is that you can't over-freeze butter. Frozen butter comes right back to room temperature beautifully, so when in doubt leave it in 5 minutes more before you fuss with it. Also, be aware that liquid butter is happy to spill all over your freezer, so take out some insurance by placing the molds on a tray with a lip. It is easier to keep things level, and to clean up spills.
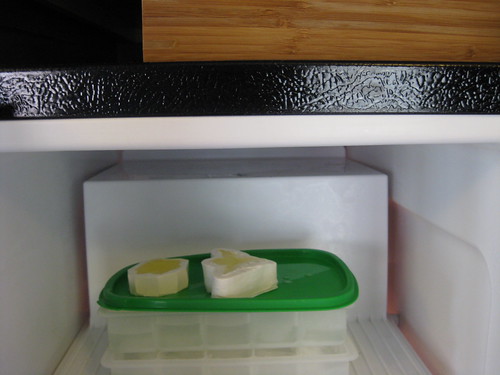
Now comes the fun part! Time to un-mold! DTC molds are extremely flexible. I like to pull back all around the edges before I pop out the molded item. If your butter is set hard enough, and your mold was compact and round, it will come out just like a chocolate or hard candy.
If your mold had thin feather wings like our friend Cupid, here is what happens. Notice, the wing I over poured came out, but with that ugly extra lip. Cupid's head was deep and round, it looks good. But that thin little wing was just too brittle and it fell apart, along with the v shaped feathers under his face. There are just some shapes and designs that are not meant to be in butter. Best to save those to make some chocolates for dessert.
But look at our lovely rose!

Now, if plain old butter is too boring for you, get creative! There are hundreds of delicious herb butter recipes out there. Here are a couple tips for making molded herb butter.
#1 The smaller the pieces of herbs, the less they will poke out or interrupt the design of your mold. Remember, we are doing this for the beauty of the finished piece in addition to the flavor.
#2 Just because every recipe on the planet says to use fresh herbs doesn't mean you cant use dry, or even better, freeze dried. Dry herbs tend to be in smaller pieces and mix into liquid butter easier than fresh. Dry herbs also have a tendency to develop their flavor over time, so they are great to use in a butter you plan to serve the next day.
#3 Experiment with your favorite flavor combinations! You don't need a recipe. Choose something to go along with whatever recipe you are making for the meal.. Herb Butter is a delicious addition on top of mashed potatoes, steak, fish or chicken as well as breads and rolls.
#4 If you are using unsalted butter and making a savoury herb butter, be sure to add some salt!
A few flavor profiles that I really love:
Garlic Powder and Thyme
Honey and Cinnamon
Cardamom and Curry Powder
Chive and Onion Powder
Ginger (I like to use fresh grated)
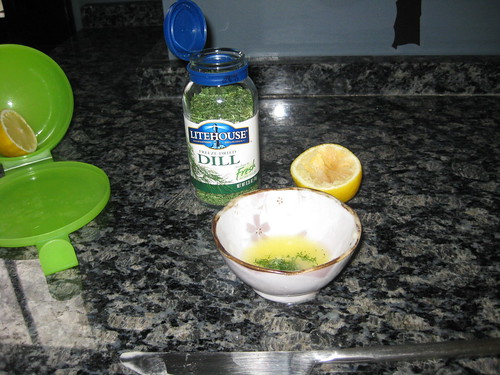
Lemon and Dill
Here is how I made the Lemon Dill Butter. I used freeze dried dill, but dry or fresh would work as well. Be sure to start with either melted or softened butter to make it easier to mix. Just a splash of lemon is enough, so start with a little and then adjust for taste. Remember, butter has a large water content, so it can take liquid ingredients if you mix well and use the right proportions. Mix, mold, and put in the freezer to set!
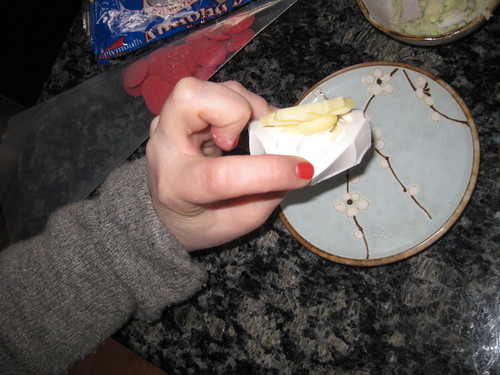
And here are my final roses, ready to sit atop a fresh bun!
I really enjoy how the dill change the color of the butter, and if you wanted to you could even add some food coloring. I prefer to have naturally colored foods, so I would most likely use something like a bit of beet juice if I wanted pink roses, or perhaps some blueberry puree if I was going for purple. Start with just a bit and add more until you get the flavor and color you want. Remember, the more liquid you add the more you soften the consistency of your room temperature butter.
Stay tuned for part 2 of my Mystery Project, a more traditional molded candy.
DTC Products Used:


This is such a lovely idea! A new way to impress guests at a dinner party! I must try molded butter and shaped sugar cubes! :)
ReplyDeleteDanielle x